
It has to be noticed that 20,000+ users downloaded How to Draw Weapons latest version on 9Apps for free every week! If you are not comfortable with the old version then you can updated it right now. This hot app was released on 2018-07-19. If you like it, just download and enjoy this app!
The portrayal of weapons in fine arts is usually as a part of a scene. However, sometimes they appear as standalone items also. One of the often-displayed pieces is the rifle, which finds uses in warfare, hunting, and sports. Rifle has a long history and there are hundreds of varieties available in the market. For drawing purpose, the type of weapon you use will greatly depend upon the theme of your work. Following is a generalized systematic guide, applicable in the artistic adaptation of most kinds of rifles:
• Reference. Weapons are precision devices with set specifications. Therefore, you must be prudent enough not to miss any important detail. Unless you want an imaginary work, it is very important to obtain a reference from some source, like internet images and print media. You may use a real rifle as your model, but that is a very unlikely case. Be careful in picking your image with right features for a particular type. For instance, large viewfinders are more common in hunting rifles than in any other type.
• Preparation. Keep your drawing tools handy. A possible list will include a ruler, pencils, erasers, sharpener, compass, stencils, etc. In arts, not many dramatic effects are added to the weapons. In effect, you can do well with your standard HB pencils.
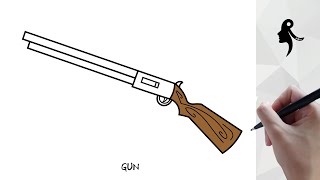
• Basic model. Nearly all the rifles are constructed upon a fundamental design, consisting of the butt, the operating section, and the barrel. Creating a skeletal frame of design is the trickiest part of such work. No matter which make you are sketching, study the reference picture or object very carefully to identify the outermost edges. Do not try to add any details simultaneously. A better approach will be to start from the tip of the barrel, moving backwards to the butt. However, you may choose another methodology depending upon your comfort level.
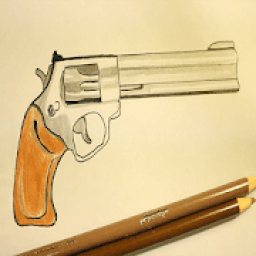
• Adding description. Always start from the outermost contours and proceeding towards the inside. Tackle one of the three main sections at a time. It is significant as every part has its own technical details. For example, the operating segment consists primarily of the trigger, the receiver, the rear sight, the operating rod, and the like. Nevertheless, different makes may vary in details. Add the finer elements, like screws, pins, support rods, etc. in the end.
• Finishing up. The image of a rifle can be kept without much pencil shading, but be sparing if you opt for it. If the weapon is set in color, it will usually be in solid black or grays. As a thumb rule, use your model for most of the effects.
ललित कला में हथियारों का चित्रण एक दृश्य के एक भाग के रूप में आम तौर पर है। लेकिन, कभी कभी वे भी स्टैंडअलोन आइटम के रूप में दिखाई देते हैं। अक्सर दिखाया गया है टुकड़ों में से एक राइफल, जो युद्ध, शिकार, और खेल में उपयोग करता है पाता है। राइफल एक लंबा इतिहास है और किस्मों के सैकड़ों बाजार में उपलब्ध नहीं है। उद्देश्य ड्राइंग के लिए, हथियार के प्रकार आप का उपयोग बहुत अपने काम के विषय पर निर्भर करेगा। के बाद एक सामान्यीकृत व्यवस्थित गाइड, राइफल के सबसे प्रकार के कलात्मक रूपांतर में लागू होता है:
• संदर्भ। हथियार सेट विनिर्देशों के साथ परिशुद्धता उपकरण होते हैं। इसलिए, आप किसी भी महत्वपूर्ण विस्तार याद नहीं पर्याप्त समझदारी होना चाहिए। जब तक आप एक काल्पनिक काम करना चाहते हैं, यह इंटरनेट छवियों और प्रिंट मीडिया जैसे कुछ स्रोत से एक संदर्भ प्राप्त करने के लिए, बहुत महत्वपूर्ण है। आप अपने मॉडल के रूप में एक असली राइफल का उपयोग कर सकते हैं, लेकिन यह एक बहुत संभावना नहीं मामला है। एक विशेष प्रकार के लिए सही सुविधाओं के साथ अपनी छवि को उठा में सावधान रहें। उदाहरण के लिए, बड़े viewfinders किसी भी अन्य प्रकार की तुलना में राइफलें शिकार में अधिक आम है।
• तैयार करना। अपने ड्राइंग उपकरण आस-पास रखें। एक संभावित सूची एक शासक, पेंसिल, erasers, शार्पनर, कम्पास, स्टेंसिल, आदि कला में, नहीं कई नाटकीय प्रभाव हथियारों से जुड़ जाते हैं शामिल होंगे। वास्तव में, आप अपने मानक एचबी पेंसिल के साथ अच्छी तरह से कर सकते हैं।
• बेसिक मॉडल। लगभग सभी राइफल एक मौलिक डिजाइन पर निर्माण कर रहे हैं, बट, ऑपरेटिंग अनुभाग, और प्रति बैरल से मिलकर। डिजाइन की एक कंकाल फ्रेम बनाना इस तरह के काम के trickiest हिस्सा है। कोई फर्क नहीं पड़ता है जो आप चित्र कर रहे हैं, संदर्भ चित्र अध्ययन या बहुत सावधानी से आपत्ति सबसे बाहरी किनारों की पहचान। किसी भी जानकारी के लिए एक साथ जोड़ने की कोशिश मत करो। एक बेहतर दृष्टिकोण बैरल की नोक से शुरू करने के लिए, बट को पीछे की ओर ले जाकर किया जाएगा। लेकिन, आप अपने आराम के स्तर पर निर्भर करता है एक और कार्यप्रणाली चुन सकते हैं।
• वर्णन जोड़ना। हमेशा सबसे बाहरी आकृति से शुरू करते हैं और अंदर की ओर आगे बढ़ने से। एक बार में तीन मुख्य वर्गों में से एक से निपटने। यह महत्वपूर्ण है के रूप में हर हिस्से का अपना तकनीकी जानकारी नहीं है। उदाहरण के लिए, ऑपरेटिंग खंड ट्रिगर, रिसीवर, रियर दृष्टि, ऑपरेटिंग रॉड, और इस तरह के मुख्य रूप से होते हैं। फिर भी, विभिन्न मॉडल विवरण में भिन्न हो सकते हैं। महीन तत्वों, शिकंजा, पिन, समर्थन छड़, आदि अंत में जोड़ें।
• पूरी तरह खत्म करना। एक राइफल की छवि बहुत पेंसिल छायांकन के बिना रखा जा सकता है, लेकिन यदि आप इसे के लिए चुनते हैं बख्शते जा। हथियार रंग में सेट है, तो यह आम तौर पर ठोस काला या स्लेटी में होगा। एक अंगूठे का नियम के रूप में, प्रभाव के अधिकांश के लिए अपने मॉडल का उपयोग करें।
9Apps 4.9